Sunday, February 2, 2020

Nurture Circle - Do good stitches 2020

We are going to do an easy "block" this month with a bunch of flying geese. To start you can make your flying geese any way you would like. I am showing how to do it with a no waste method. This chart is from blocloc and I find it very helpful even if you don't have the blocloc rulers.


To start you want to cut the following


  • 4 squares of jewel tone/bright pink and purple fabric (7 1/2")
  • 16 squares of low volume creamy/ivory fabric (4 1/8")
  • 4 rectangles of jewel tone/bright pink or purple fabric (6 1/2" x 3 1/2") *not pictured


Once you have your fabric cut you want to draw a line on the back of each of your cream colored low volume fabric squares.


Now you will sew two low volume squares on the diagonal of a pink or purple block. Place your blocks right sides together. You will sew 1/4" from each side of the diagonal line.


Once you have your squares sewn together you will cut along the diagonal line.


Now iron the white fabric away from the darker fabric leaving you with some "hearts" . There is your valentines day surprise!!!


Now you will sew another white square to each of your hearts on both sides of the drawn line.


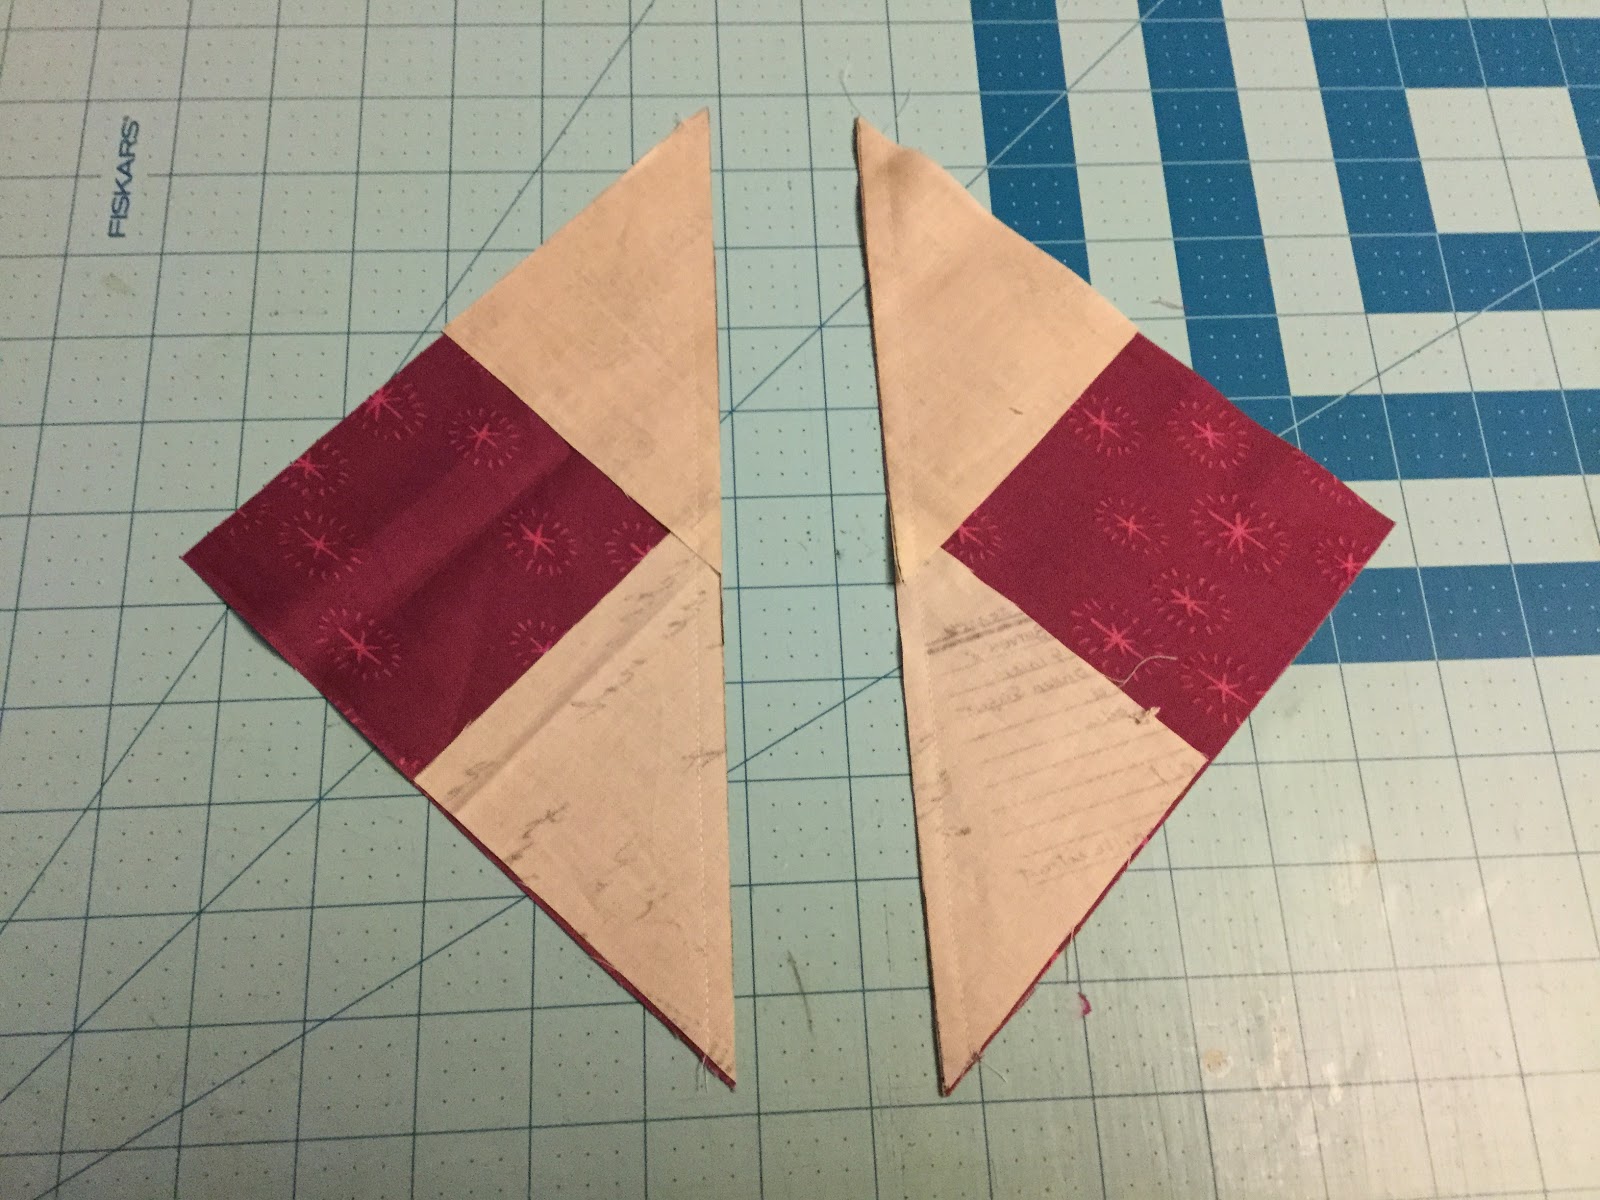
Now cut the hearts apart and iron your second wing away from the dark fabric. 


Once you have all your 16 flying geese you want to trim down to 6 1/2" x 3 1/2". Make sure to line up the 45 degree angle of your pink/purple triangle to keep your geese square.

Finally select two pairs of matching geese and one pink/purple rectangle and sew together in the layout below. 


Please make 4 of the units. They should finish at 15 1/2" x 3 1/2"


Saturday, February 2, 2019

Feb 2019 do.good.stitches Nurture Circle - Moda Love

           Ladies since it is Valentine's day this month let's feel the love in this quilt. For this month we will be making 2 12" blocks of the Moda Love pattern. Take a peak at the 3rd page for instructions for the 12" block. 
         To start off we are going to make one red block with a grey star in the middle and one grey block with a red star in the middle. Feel free to raid your scrap bin and mix it up. 

Step 1: Cut 18 - 2.5" Red Squares, 18 - 2.5" Medium to Dark Grey Squares, and 36 - 2.5" white, white on white or low volume Squares.

Step 2: Draw diagonal lines on the back side of the 36 - 2.5" background (white squares)

Step 3: Match a background square with a 2.5" red or grey square, right sides together.

Step 4: Stitch a 1/4" on each side of the diagonal line on the background square
 
Step 5: Cut on the diagonal line, press toward the dark side, trim HST to 2"

You should now have 36 - 2" red HST and 36 - 2" grey HST


Step 6: Cut 12 - 2" Red squares, 12 - 2" Grey Squares, and 32 - 2" Background Squares


Step 7: Arrange squares according to the layout in the Moda Love link. The star in the middle should be the opposite color than the outer ring. You will need 12 HST of the alternate color to  make the star in the middle. 


Step 8: Sew together the rows and press the odd numbered rows to the left and the even numbered rows to the right. Sew the rows together nesting the seams, Press the final seams of the rows in the same direction, either up or down. Your finished blocks will look like the samples below. 


Tuesday, May 1, 2018

May block for the Nurture Circle of do.good.stitches

Ladies we will be creating a nested star block this month for our quilt. We will be utilizing a tutorial from Dairy of a Quilter. I recently made a baby quilt using these blocks.

The color palette for this quilt is drawn from a fabric inspiration, Art Gallery Wonderful Things Canvas Aquarelle Study Wash Fabric. I created a digital palette to give a better ideas of the colors we are looking for.


The colors range from pale peach to punch , pale pink to raspberry, light grey blue to navy (no teal). You can also include white and low volume fabrics that feature pink, peach and blue and grey.

To start you are going to pick 4 fabrics for the block (we are making one 16 inch block). Make sure to audition your fabrics to see how the colors will play in the block. You want to verify that each fabric will stand up well against the fabrics next to it and not blend together.


Now to start cutting.

Fabric A - Center Star:  1 - 2.5" square
                                       4 - 2" squares
Fabric B - 2nd Star:       1 - 3.25" square
                                       4 - 1.5" squares
                                       4 - 3" squares
Fabric C - 3rd Star:        1 - 5.25" square 
                                       4 - 2.5" squares
                                       4 - 5" squares
Fabric D - Background: 1 - 9.25" square 
                                       4 - 4.5" squares

Use the following tutorial and fabrics highlighted in yellow to create a 4.5" star (4" finished) on the chart above.

This will give you a 4.5" star that will be used as the center of your growing block. Continue to create a star again, with the 4.5" star as the center and the instructions for the 8"x 8" block (purple highlighted fabrics).

Finally you will take the 8.5" double star and utilize it as the center for your last round (16" block), utilizing the green highlighted fabrics.

This will produce one triple star block


For the second step you will utilize the same tutorial to create 2 - 4.5" star blocks. This time using white or low volume fabrics (with grey, pink, peach, or blue) for the background and the center star should be pink, peach or blue-grey.

Your finished blocks should look something like this.


Please ship to the address listed in the email. Thanks Dhia


Wednesday, February 1, 2017

All you need is love - Feb Nurture Circle - Do.Good.Stitches

This month I am the quilter this month for the Nurture circle of Do.Good.Stitches. I signed up and had a million ideas. For some reason I had it stuck in my head that I was the quilter in March. I think it is because we are going to Seattle in March and I decided to sign up for another month since I would be traveling. Thankfully Louise emailed me to remind me to get off my bun and plan a quilt. I have a hearty folder of potential quilts saved as most of us do. I decided since it was February and Valentines Day is around the corner  we should but together some blocks filled with L - O - V - E.

So this month we will be making an assortment of heart blocks. All blocks will be made of your choice of Red, Pink and White/Low volume Fabrics. For the first block I would like everyone make one of the following blocks.

Heart A - The heart from Michael Millers Cupid's Arrow quilt.


To make Heart A you will need to cut 
(2) 3.5" background squares
(4) 4" background squares
(10) 4" heart fabric squares

You can make your heart the colored portion of the block or the background can be the colored portion. Let your imagination run wild.

Draw a diagonal line on the back of each of your 4 - 4" background squares and 3 - 4" heart squares.
Match one 4" background square with one of your 4" unmarked heart squares.
Sew 1/4" to each side of your diagonal line
Match one marked 4" heart square with one of your unmarked heart squares
Sew 1/4" to each side of your diagonal line

You should now have 7 squares sewn together
Cut along the diagonal line to separate into half square triangles.
Press toward the darker fabric in each HST and trim to 3.5"

Lay out your block as pictured


Sew together and alternate the direction that you are pressing your seams. The final block should finish at 12.5"

OR

Heart B - The "Be good to your heart" block by Amy Smart from Diary of a quilter


Amy has great directions on her blog so I won't reinvent the wheel. Pick any three fabrics you would like (red, pink, white/low volume) Make sure there is good contrast between the fabrics you choose so the hearts pop. Alternate the directions you press your seams. The block will finish at 12.5"

AND

Heart C - Everyone will make some simple heart blocks from Allison @ CluckCluckSew
Directions here
Multiple size measurements here


Please make (2) 6" blocks and (3) 4" blocks. 
Again choose any combination of red/pink/low volume fabrics.

Any questions let me know!!


Saturday, November 26, 2016

A place for baby Abigail...

I have spent the last few months since the baby was born reorganizing my craft room to make room for baby Abigail. I know it sounds like I thing I should have done before she was born but it never happened. She has been enjoying life in bassinets, swings, and rock n plays. A baby with no bed of her own!! So sad. As she has been getting bigger it's become apparent that we could not keep her in a bassinet much longer. Last week my mom was visiting so I utilized the time to get things done so we could get the baby in her crib. 

My ironing board used to be here and my rod to hang my quilts.

I also moved around my craft table/desk and sewing table. So now this is what it looks like. Sooo clean and organized at the moment. I figured photographic evidence was necessary.

oooooooooooooh

aaaaaaaaaah

I have also been working on a string quilt to slash through my scraps. I have finished up all the string blocks and just have to trim up about half. I scored some new blades for my rotary cutter at a black friday sale at Joann fabrics. So I should have them trimmed up shortly. It turns out one quilt is not going to make a dent in my scrap stash.


I have been debating on the layout of the blocks. The star layout would have low volume blocks in the corners. The quilt would have 4 stars. 


It would be similar to the quilt I made for Mirabelle about a year ago. Although the individual blocks were only 5" and the current quilt has an 8" block.


I also looked at a zig zag pattern or a string block diamonds


 I'm not sure of the final layout. At present I have enough blocks for the 4 star layout.

Last but not least I wanted to remind everyone about the Santa Stash Swap.


I haven't had a chance to spread the word too much. You can still sign up until 11/28!!!

Linking up to crazy mom quilts


Saturday, November 12, 2016

Santa's Stash Swap

 I know I personally end up with extra fabric at the end of most of my quilting projects. In some cases I see something I love or that is on sale and grab it up but haven't found a project for it and it's sitting in my stash. Other times I buy a fabric and think it's the right one and get home and change my mind. Some quilts get more than one backing before I decide which way to go. I don't think I'm the only one with this problem. In any event this is a swap for people with extra stash that they would like to shake up.

I am hoping that this one will turn out well and will be a lot of fun!! For this swap you can choose what you would like to send, and what you would like to receive. The options are 4 fat quarters or an 8 oz bag of scraps. 


This is a Secret Santa style swap. Meaning that the person you send to is not necessarily the person who will send a package to you. The guidelines are as follows.

  • The swap is open to participants in the USA only to keep shipping costs low.
  • You will send your package by a method that includes a tracking number.(USPS first class parcel includes tracking if mailed from the post office I believe.)
  • All fabric should be quilt shop quality fabric. 
  • Send good quality fabric that you would want to receive. 
  • If choosing the scrap option make sure pieces are at least 2.5" in every direction and no larger than a fat quarter (18" x 22")
  • If choosing the fat quarter option make sure they are 18" x 22" each.
  • If you would like to participate please send the following information to SecretSantaSwap2016@gmail.com by 11/26/2016.
    • What you will send (4 fat quarters or 8 oz of scraps)
    • What you would like to receive (4 fat quarters or 8 oz of scraps)
    • What types of fabrics you like, be as specific as possible to help your partner.
      • Example: I like red and blue fabrics, I am working on an eye spy quilt right now and could use some more fabrics. My favorite fabrics are Robert Kaufmann and Riley Blake. I don't like yellows and gold. I don't like floral fabrics or 1930's reproductions.
    • And finally include your name and mailing address.
  • I will send your Secret Santa information to you and their wish list by 11/28/2016.
    • Pick, package and mail to your Secret Santa by 12/17/2016 to hopefully receive by Christmas.
      • Make sure that you do your best to follow the wish list of who you are sending to. The idea is to swap from within your stash so get as close as you can to their wishes. You can shop for fabric if you would like to, or if you need a reason to go to a quilt shop.
    • Post the goodies you receive at the Santa Stash Swap Flickr page.

    ***The bag in the picture weighs 8.57 oz and fills a quart size ziploc bag pretty snuggly. This quart size ziploc bag empty weights 1/4 oz. Make sure to check your weight on a kitchen scale or at the post office. Quilting cotton weighs about 5-6 oz per yard, and batiks are about 4 oz per yard. So know that batik heavy scrap bags will take a little more to get to 8 oz.***

    Can't wait to get to swapping!

    Thursday, October 27, 2016

    I'm so crafty it scary!

    Just a quick post about something I whipped up for my little girl this weekend. I started thinking about making trick or treat bags long before I had kids. I bought the fabric and it has been in my stash for some time now. Either that or I caught it on clearance. 

    When Moda came out with "Candy" charms I did an "I want Candy" charm swap. I enclosed a piece of the candy print at the time with each pack I sent out to the people who were my swap partners. It was also about that time that everyone was taking on the scrap vomit quilts and granny squares. There really is so much you can do with a 2.5" square! 

    So in conclusion it looks like this fabric has been in my grasp since 2012, and I am pretty sure its not the oldest stash fabric. Some day I will get help for my fabric buying..... You can catch a glimpse of my fabricy shame in the background of the picture. At least now it is well organized by color. 

    So the day before the trunk or treat I decide that I want to make a trick or treat bag for Mirabelle. I was up with baby Abigail and surfing around the internet. I found this pattern and decided it was a better option than trying to reinvent the wheel or work out some of my half baked ideas. 

    I think it turned out pretty good. I didn't get any actions shots of its use though. Hopefully I will be able to soon. 


    What's great about this pattern is that you can make any size you would like. I scaled down the pattern from a 15" square to a 12" square. I also cut my fabric into 2 rectangles (12" x 24") instead of 2 12" squares. Mostly to save me the headache of having to line up one more side. I still stitched the side so there would be a seam to line up things. 

    The bag is reversible an it comes together very quickly. I waited until the day of the trunk or treat and was done in less than an hour. It might take you longer to pick fabrics from your stash! I just happened to have one of the fabrics in my collection that she used in her tutorial.